
Prosess Paper
for Charactor Development
- the Load of Inferno
Part One: Introduction

The Load of Inferno, who comes from a under world, is a powerful leader of hundreds of creature. Going through countless wars, he lives for fighting, protecting the order of his world.
Age:
He has been living over 1000 years, but still looks like a 45 year old muscle man.
Inspiration:
a combination of Four famous creature- Cerberus (Three head dog); Centaur; Minotaur; Red Bull. He used to be a three head bull. the central head gets extre power, and evolves into a humanlike body.

Living place:
underworld, forrest of hell, red jungle.
Personality:
calm, decisive, brave, strong, ruthless.
Status:
the king of underworld. the head of bull warriors army.
Weapon:
sickle(connected with his arm cuff through iron chain that can be throw it out and back), javelin, shield.


Armor:
Shoulder armor - stone material, leather belt connected;
Arm armor - cuff, iron chain rounded, metalline bull mask;
Belt - a combination of stone, leather, metal;
Necklace of bull head - the same as body belt;
Back armor - metal net, bull head shape decoration;
Rope - connect the loop of shoulder armor with bull head's nose rings;
Iron chains added in several parts of armors.

Consept sketch: the original concept has a more bulllike head, and a extra harmer weapon. Then I drop these idea during sculpting process.


Material reference:
Stone
Rough metal
Shiny metal
Fabric


Bone
Fur
Leather
Skin (little fur, wax)
Eye
Shading list based on each object
1. Bullbody - skin (fur, wax)
2. Hornfoot - picture reference
3. Lefthead - fur
4. Righthead - fur
5. Stonebelt - leather
6. Upbody - skin (fabric, fur, wax)
7. Shoulderarmor - stone
8. Bullheadarmor - rough metal
9. Cuff - fabric
10. Hole - rough metal
11. Backarmorblack - rough metal
12. Centerbelt- leather
13. Beltgold - shiny metal
14. Bullbeltshine - shiny metal
15. Rope - fabric
16. Eyes - eye
17. Beltshinegold - shiny metal
18. Weaponarrow - shiny metal
19. Beard - fur
20. Backarmor - rough metal
21. Weaponbone - bone
22. Bullbeltleather - leather
23. Weaponmetalmid - rough metal
24. Weaponhead - shiny metal
25. Weaponpurple - rough metal
26. Iron Chain - rough metal
27. Backchain - shiny metal

Rendering style:
realistic
Technical challenge:
1. Fur. I will try nHair in Maya to creat realistic fur effect.
2. Displacement map used and render time. All single object has displacement map, and the basic poly count is up to 1 millions, which is a big problem for render time.
Part Two: Shading and Texture
The steps:
1. Analysis/reference choose;
2. UV layout;
3. Create details with normal and displacement map;
4. Create skin shading;
5. Create skin texture;
6. Eyeball modeling, shading and texturing;
7. Camera set and rendering;
8. After Effect compositing.
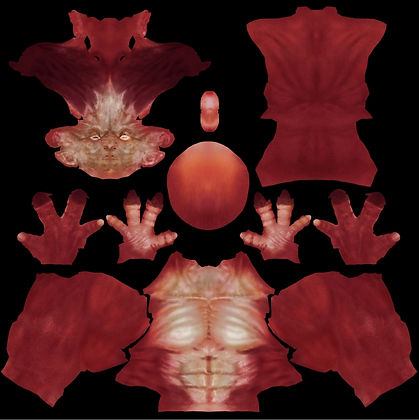
1.Analysis/reference:
Based on realistic skin painting, I create the shading and texture of my creature as a half human, half animal surface. I take image reference from the character in Warcraft, and the famous Asian myth character - the Monkey King.
Simillar to a monkey, his body skin can be seperater into two major pieces: the front body is smooth, shiny, brighter, less and short fur; on the contrary, the back is rough, dark, brown, more and long fur.


2.UV layout:
I use both UV layout and Maya to create and organize UV maps for both upbody and bull head.


3. Create details with normal and displacement map
Import obj files into Zbrush 4R7 to sculpt details.
Here are the brushs and Alpha I used:


Brushs
Alpha
After sculpture is done, create both normal and displacement map, and export as a 8192X8192 tiff image.


White shader
Grid texture
With Normal and Dis maps on
4. Create skin shader
To create realistic human skin, I use mental ray miss_fast_skin_maya shader for my skin. I adjust Diffuse/ Epidermal/ Subdermal/ Back Scatter/ Specularity one by one, then composite them one upon one gradually to get my basic shader right.


Back Scatter
Subdermal Scatter


Epidermal Scatter


Diffuse


Specularity (I use weight maps to control specular in different area, I will explain them later)

Composite all different layers
4. Create skin texture
Using both Zbrush polypaint, Mari and Photoshop to paint different texture maps. Works with alphas that I used to sculpt the model.


Diffuse color
More brown tone color.
Epicdermal scatter color
Based on diffuse color map, desaturate it a little bit. Adjust the color levers and contrast in Photoshop. Also, I blur some detail like veins, wrinkle on face.
Subdermal scatter color
Multiply red or blue tone upon diffuse color map, adjust the opacity. Then add little detail on face with alpha brush.


Cavity map
Generate it from Zbrush, then put in on Secondary specular weight to narrow down sharper specular, better control it with different weight.
Specular map
I overlay desaturated diffuse color map with cavity map to get this. Then put it on overall weight. As you can see, the body back area and the horn have less value compare with the front.

The result
6. Eyeball modeling, shading and texturing
Model and sculpt detail of eyeball in Zbrush, then
export the maps.


Edit subdermal color map in Mari.
Add more veins with different color tone.
Displacement / Normal map.


Model the outside layer of eyeball, give it a Blinn shader with 1 transparency.
The result
7. Different Camera set render


8. Video
Part Two: Shading and Texture
Part Three: Armor and Fur
In this part, I started from creating the armor of bullhead, and then the rest of all armors, weapon, shield and decoration. At last, the most important thing - fur.
Armor - The build up of belt


Stone
Blinn shader
Leather
Blinn shader
Copper
Mia_material
Chain
Blinn shader


Armor - The build up of shield
Stone
Blinn shader
Metal
Mia_metallic_paint
Metal
Mia_material
Leather
Blinn


Armor - The build up of Weapon
Bone&Leather
Mia_fast_skin_shader&Blinn
Metal
Mia_material
Metal
Mia_Metallic_paint


Armor - The build up of BackArmor
Metal
Mia_Metallic_paint
Metal
Blinn
Metal
Blinn
Metal
Blinn

Maya Fur
It is my first time using Maya fur system. I need to creat 4 different fur for my character- upbody, bullhead, bullbody and beard.
Different fur has different lenth, color, clumping. I need to paint several maps using fur paint tools.
Upbody fur

I started from generating basic fur, adjusting some attribute like lenth, inclination, roll, polar, base width, tip width. It is not necessary to be exactly correct cause I will paint every attribute with fur paint tool later. Just get a first quick result.
When first editting, I worked in a low density like 50000 for responsing quickly.

*Go to FurFeedbackShape node, increase both U and V samples for more controlable fur amount.

Color correct the Upbody color map to generate base color and tip color map for fur.
More red tone for the base; and brighter and desaturated for tip.

Paint fur.
Start from direction to get basic fur direction due to anatomy and gravity.

It depends if the symmetry turn on or off.

Sometimes I need to export value map, and import it into Photoshop changing value. It help me get accurate result. For example, Baldness value map. It is hard to get right in details for that. In Photoshop, layover the map with color map of unbody, compare with it. Then I know where I need to make it bald or not.

Add noise for most of attributes, especially the lenth and clumping.


Add fur shadowing attribute for both main light and back light to generate fur shadow.

*Turn on visibilty of armor covered on body, then paint the baldness and inclination to avoid fur explosion.

Finish the rest part of fur, then do render test.


Final Video

